| Index |
- This is what you need:
- \i386 folders from the original Microsoft Windows
XP/2000/NT CDs.
- Setup files (from each Windows version):
It is possible to get the files from the distribution,
but the easiest way is to copy them from the bootdisks of Microsoft Windows XP/2000/NT (all files of the bootdisks are required setup files).
Attention: Each distribution has it's own set of bootdisks according to the integrated updates, i.e. if your distribution is WinXP SP1 you'll also need the WinXP SP1 bootdisks (not the ones of WinXP).
Where to get the disks:- Bootdisks for Microsoft Windows XP are available on
the Microsoft site
- Bootdisks for Microsoft Windows 2000 can be found on the original Windows 2000 CD-ROM in the subfolder \BOOTDISK
- Bootdisks for Microsoft Windows NT can be created
by executing the command \I386\WINNT.EXE /OX from the NT CD-ROM.
- Bootdisks for Microsoft Windows XP are available on
the Microsoft site
- Additionally needed setup identificaton files (for each
seperate distribution):
Windows version
Necessary files
2003 Enterprise WIN51 and WIN51IA 2003 Standard WIN51 and WIN51IS 2003 Web WIN51 and WIN51IB XP Home WIN51 and WIN51IC XP Professional WIN51 and WIN51IP 2000 Professional CDROM_NT.5 and CDROM_IP.5 2000 Server CDROM_NT.5 and CDROM_IS.5 2000 Advanced Server CDROM_NT.5 and CDROM_IA.5 2000 Datacenter Server CDROM_NT.5 and CDROM_ID.5 NT Workstation CDROM_W.40 NT Server CDROM_S.40 NT Terminal Server CDROM_TS.40 - If your distribution already contains ServicePacks, or
you are using slipstreamed CDs with Service Packs, you'll also need the
following setup indentification files (according to the respective ServicePack):
Service Pack
Necessary files
XP Home Service Pack 1 WIN51IC.SP1 XP Professional Service Pack 1 WIN51IP.SP1 2000 Service Pack 1 CDROM_SP.TST 2000 Service Pack 2 CDROMSP2.TST 2000 Service Pack 3 CDROMSP3.TST 2000 Service Pack 4 CDROMSP4.TST - The BootManager Bootable CD Wizard
- \i386 folders from the original Microsoft Windows
XP/2000/NT CDs.
- How to create the CD?
- Create a folder which will contain all the files for
your Bootable CD, e.g.:
C:\MyBootCD
- In this folder, create subfolders for each distribution
(e.g. NT_1, NT_2, NT_3) you plan to integrate, e.g.:
C:\MyBootCD\NT_1
C:\MyBootCD\NT_2
C:\MyBootCD\NT_3
etc. - Copy the \i386 folders of your distributions the the
corresponding folders created above. Attention: Copy the folders, not
only their contents. Your folder on should now look similar to this:
C:\MyBootCD\NT_1\I386
C:\MyBootCD\NT_2\I386
C:\MyBootCD\NT_3\I386
etc.
- Copy the necessary setup files (see above) to the
corresponding folders, i.e. the folders also containing \i386:
C:\MyBootCD\NT_1
C:\MyBootCD\NT_2
C:\MyBootCD\NT_3
etc.
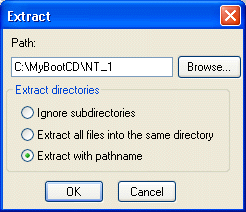
Attention: If you are using WinImage to extract the setup files from disk images, make sure you use the option "Extract with pathname", as there is at least one subfolder on the bootdisks (system32).

- In the folders NT_?, use a HexEditor (e.g., WinHex) to edit the
files SETUPLDR.BIN Replace all occurrences of
'I386' ...
...with 'NT_1' in the file C:\MyBootCD\NT_1\SETUPLDR.BIN
...with 'NT_2' in the file C:\MyBootCD\NT_2\SETUPLDR.BIN
...with 'NT_3' in the file C:\MyBootCD\NT_3\SETUPLDR.BIN
etc.
- In the folders NT_?, use a text editor
(e.g., Windows Notepad) to edit the files TXTSETUP.SIF. Replace:
SetupSourcePath = "\" ...
...with SetupSourcePath = "\NT_1\" in the file C:\MyBootCD\NT_1\TXTSETUP.SIF
...with SetupSourcePath = "\NT_2\" in the file C:\MyBootCD\NT_2\TXTSETUP.SIF
...with SetupSourcePath = "\NT_3\" in the file C:\MyBootCD\NT_3\TXTSETUP.SIF
etc.
Attention: On the WinXP bootdisk, the file TXTSETUP.SIF is packed. You will have to delete TXTSETUP.SI_ (imperial) and copy the TEXTSETUP.SIF from your \i386 folder.
- In case you have a file BOOTFONT.BIN in the NT_?
folders, rename it to FNT.BIN. Use a HexEditor (e.g., WinHex) to edit the
files SETUPLDR.BIN. Replace:
'BOOTFONT.BIN' ...
...with 'NT_1\FNT.BIN' in the file C:\MyBootCD\NT_1\SETUPLDR.BIN
...with 'NT_2\FNT.BIN' in the file C:\MyBootCD\NT_2\SETUPLDR.BIN
...with 'NT_3\FNT.BIN' in the file C:\MyBootCD\NT_3\SETUPLDR.BIN
etc.
- Now add the complete set of setup identification files (see
above)to C:\MyBootCD and to the corresponding NT_? folders.
Attention: The setup identification files must be in both folders, C:\MyBootCD (which will be root of the bootable CD) and the NT_? folders (set of setup identification files corresponding to the distribution).
- Unpack the archive Bootable CD Wizard to C:\MyBootCD
- Edit the file C:\MyBootCD\BootCat.Ini
(configuration file of Bootable
CD Wizard) and add the locations and descriptions of your
distributions:
\NT_1\SETUPLDR.BIN ; Install Microsoft Windows #1
\NT_2\SETUPLDR.BIN ; Install Microsoft Windows #2
\NT_3\SETUPLDR.BIN ; Install Microsoft Windows #3
etc.
- In your CD writing program, open a new bootable CD
project with the following settings:
Boot image: C:\MyBootCD\bcdwboot.bin
BootMode: No emulation (without emulation)
Boot segment (adress): 07c0
Number of sectors to load: 4
(detailed howtos: Nero, CDRWin, Easy CD Creator, Instant CD+DVD, WinOnCD, CDImage and mkisofs)
- Add the contents of C:\MyBootCD\ to the project
- Add your files
- Burn the disk.
- Create a folder which will contain all the files for
your Bootable CD, e.g.:
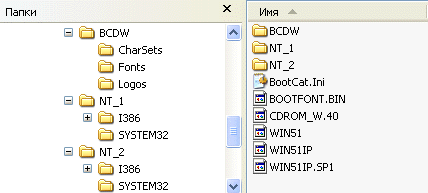
- Directory listing of a CD with BootableCDWizard containing
russian versions of
Microsoft Windows NT Workstation and Microsoft Windows XP Professional
SP1:

English translation by Wolfgang Brinkmann